
Pre-painting MDF: Paint the Kit Before Assembly

Getting started with MDF · Gary’s painting method
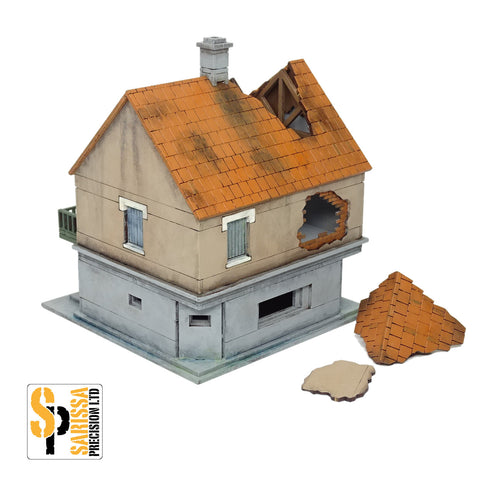
Pre-painting here means painting the parts yourself before you assemble the kit. Gary Faulkner uses a 15mm Maison Forte to show how quickly an unpainted MDF building can be ready for a game.
A guide by Gary Faulkner, Sarissa Precision’s head of design and author of our MDF modelling book.
I’m using five acrylic colours for the basic finish. There are a few extra effects later, but you can stop after assembly and edge touch-ups if you just want the building on the table.
Read the instructions and find the parts
Look through the instructions and the kit layout before you start. The parts are nested together on the sheets to save material and cutting time. Knowing which piece is which lets you put colour down where it’s needed.
The brushes are clean, with no scraggy dry-brush ends. You’ll also see some water-based brush pens in the photograph; those come into the weathering stage later.

Paint while the parts are on the sheets
I use the paint fairly thick, with only a little water on the brush to help it flow. Paint the faces and parts you want coloured. I use more than one brush so one can be cleaning or drying while I work with another colour.
Paint both sides where needed. Thicker paint is less likely to bleed into the cut edges.


After opening the kit and reading the instructions, this painting stage took me about 30 minutes. A simpler, single-skin building can take less time.
Build it and touch up the edges
Take the parts out of the sheets and sand the small tag marks, as you would on a plastic model kit. I also cleaned off paint that had gone over the sides.
Assembly took me about 45 minutes, including the sanding. I use superglue gel. No elastic bands or clothes pegs were harmed in the making of this kit.
Using the same paints for the cut edges gives you a matching touch-up colour. That took another 10 minutes, and the building was ready for the table.


Before weathering, leave the base paint to dry fully. You can game with the building for a day and come back to the extra effects later.
Add weathering with Ecoline brush pens
I used Ecoline water-based brush pens, rather than standard markers. The pen lets you draw colour where you want the shading, then soften it with a damp brush.
I used two grey tones and added Indigo to the doors. Don’t worry about making every mark neat at this stage; the next photographs show how the brush blends it.


The darker and stronger the pen colour, the more it can stain the base paint. Don’t assume every mark will wash away completely. Try the colour on a spare painted piece first, particularly if you’re using a different paint or pen.
Brush pens can also help with timber-frame details: use a light base colour and draw the lines where you need them.
Blend the marks with a damp brush
Use a clean round brush. I use sizes 1, 2, 3 and 4. Wet the brush, take the excess water off on tissue, then work over the edges of the pen marks.
Use more or less water as you would with inks. The photograph below shows the effect part way through.

The pen marks took about 10 minutes to apply, then another 30 minutes to blend and add colour where it was needed. I finished with a clear matt spray.

Gary’s timings for this build: about 30 minutes painting, 45 minutes assembling, 10 minutes touching up the edges, 10 minutes applying pen marks and 30 minutes blending them. Allow drying time between the stages.
The finished building

Equipment and materials used
These are the materials I used for the photographed build. The colours and product codes are included so you can compare them with what you already have.
Acrylic paints
- Revell Matt Brown — 361-85
- Revell Matt Beige — 361-89
- Revell Matt Dark Green — 361-39
- Revell Matt Light Grey — 361-76
- Revell Matt White — 361-05
Glue and finish
- Sarissa Precision High Viscosity Super Glue
- Belton (Molotow Artist) matt spray, 400ml
Brushes
- Daler-Rowney System 3, short flat
- Daler-Rowney Graduate, flat wash and round
- Winsor & Newton Cotman series 111, round
Ecoline brush pens
- Grey — 704
- Warm Grey — 718
- Indigo — 533, used on the doors
The Maison Forte kit is available in 15mm · 20mm · 28mm. This build uses the 15mm version.

POST COMMENTS