Rigging the Cog
Rigging Your Cog
We've all seen the fully rigged model sailing ships in cabinets and looked in amazement. With great abandon many have shot off to the model shop and bought a kit and then given up at the last stage – Rigging!
In our case DON’T PANIC!. This model is not as demanding when it comes to rigging up at the end. In fact, you don’t even have too. However, we have been asked by some more intrepid modellers to give a short overview of how the example on the web site was rigged.
So here goes. Hope it Helps.
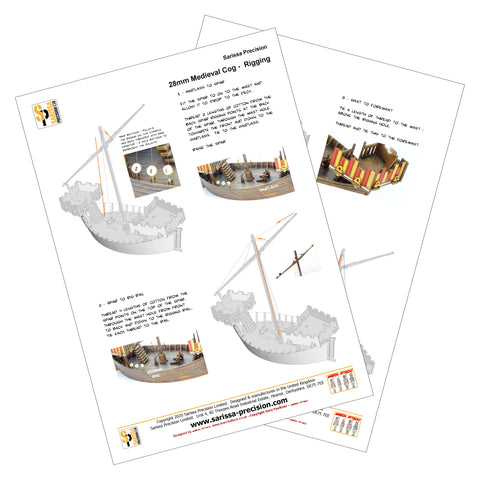
1 – Windlass to spar
Fit the spar to on to the mast and allow it to ‘drop’ to the deck.
Thread 2 lengths of cotton from the back spar rigging points at the back of the spar, through the mast hole towards the front and down to the windlass. Tie to the windlass.
Raise the spar

2 – Spar to Rig Rail
Thread 4 lengths of cotton from the spar points on the top of the spar, through the mast hole from front to back and down to the rigging rail.. Tie each thread to the rail.

3 – Mast to Foremast
Tie a length of thread to the mast – above the rigging hole.
Thread and tie this to the foremast.

4 – Mast to hull
Tie the mast to hull threads to the mast, above the rigging hole.
Thread and tie these to the front 3 hull rigging points.
Repeat for both sides.

NOTE
The 4th rigging hole is for use with a sail. The thread would tie to the bottom sail corners.
The pulleys are 5mm Dia 2 hole Dolls Clothing Buttons.


